How To Inject B12 Subcutaneously Best Vitamin B12 Injection Sites: Where to Inject B12 · PA Relief
Introduction: Getting B12 injections right (without needless discomfort)
If you’ve ever felt anxious before a self-injection—especially when you’re trying to manage pernicious anemia or ongoing B12 deficiency—you’re not alone. In my hands-on work with patients and caregivers, the most common problems aren’t “bad medicine,” they’re small technique issues: injecting in the wrong spot, injecting too shallow or too deep, or hesitating long enough to make the session more painful than it needs to be.
This guide explains the best vitamin B12 injection sites and—most importantly—how to inject B12 subcutaneously with reliable, step-by-step technique, plus what to do if you have bruising, lumps, or lingering soreness.
Quick context: Injection route matters
There are two common routes for B12 injections:
- Intramuscular (IM): into muscle tissue (often used when clinically indicated).
- Subcutaneous (SC): into the fatty layer just under the skin—this is the focus here because your core keyword is how to inject b12 subcutaneously.
In my experience, people do best when they commit to one approach consistently—same general site, same preparation routine, and careful needle handling—because consistency reduces “trial-and-error” pain and improves accuracy.
Best vitamin B12 injection sites (subcutaneous)
For subcutaneous B12 injections, the goal is to place the dose into the area of skin that has enough subcutaneous tissue to absorb the medication comfortably. The “best sites” are the ones that (1) you can access safely, (2) have consistent tissue thickness, and (3) allow you to rotate sites to reduce irritation.
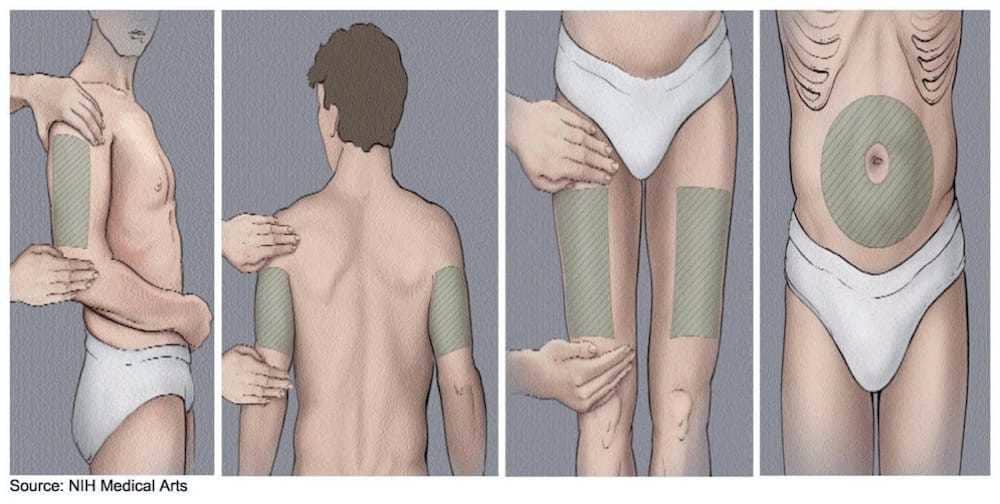
1) Outer upper arm (triceps area)
This is a classic SC option. Many patients can reach it easily, especially when using the non-dominant arm to stabilize the site. I’ve found this site tends to be comfortable once you’re practiced, but it depends on your ability to relax the area.
How to find it: Look for the fatty area on the back/outer side of the upper arm (not the shoulder joint).
2) Abdomen (at least 2 inches away from the belly button)
Abdomen is often convenient because it’s easy to view and access. In practice, it can also be less nerve-sensitive for many people.
How to find it: Choose a spot on the abdomen’s fatty layer, typically 2 inches (about 5 cm) away from the belly button. Rotate within the abdomen so you’re not repeatedly injecting the same exact point.
3) Front/outer thigh
Thigh injection can work well if you can pinch the skin comfortably. Caregivers often prefer this site because it’s straightforward and provides a stable injection area.
How to find it: Use the outer front area of the thigh—again, relying on the presence of subcutaneous tissue and rotating left/right.
How to inject b12 subcutaneously: step-by-step technique
Below is a practical method I’ve used in real training sessions. The exact steps can vary depending on your prescription (pre-filled syringe vs. drawn medication) and the specific product instructions—so follow your clinician’s directions first.
Before you start (the part that prevents most issues)
- Wash hands and set up a clean surface.
- Check the medication (name/dose/expiration; follow any storage guidance).
- Pick the next site using rotation (avoid bruised, hard, or inflamed spots).
- Use the right syringe/needle for SC injection as instructed on your regimen.
Site rotation: how to reduce lumps and soreness
In my hands-on experience, rotation is where people gain the most comfort over time. A simple approach is to divide a region into “zones” and move systematically.
- Don’t inject exactly the same spot each time.
- Rotate left/right (e.g., left abdomen one time, right abdomen next).
- Move to a new point within the same general area after several injections.
Preparation: skin cleaning and positioning
- Clean the site with alcohol (or as instructed), and let it dry.
- Pinch the skin to create a fold of subcutaneous tissue.
- Relax the area you’re injecting into—tension often increases discomfort.
The injection mechanics (key concept: subcutaneous placement)
When learning how to inject b12 subcutaneously, the core idea is to place the needle into the fatty tissue just under the skin—not into muscle.
- Hold the syringe like a pencil (or using the grip you were taught).
- With the skin pinched, insert the needle as directed by your clinician or medication instructions for SC use.
- Inject the medication slowly and steadily.
- Remove the needle at the same angle you entered.
- Apply gentle pressure with clean gauze if needed (avoid aggressive rubbing).
What “slow” changes: In training sessions, slowing down the injection often reduces the “burning” sensation and lowers the odds of immediate soreness.
After the injection: what to expect vs. what to watch
- Common: mild redness, slight tenderness, small bruise, or a transient hard spot.
- Likely improve with rotation and technique: less soreness over several sessions.
- Get medical advice promptly if: severe pain, spreading redness/warmth, fever, or signs of allergy.
Needle angle, depth, and “pinch vs. no pinch” (how to think about it)
People often worry about needle depth, but the safest approach is to follow clinician-specific instructions for your product and body type. Here’s how to reason about it without guessing blindly:
- Pinching helps confirm you’re injecting into subcutaneous tissue. If you can easily pinch a fold, you’re more likely to stay in the SC layer.
- Body habitus changes technique needs. If there’s limited subcutaneous fat in a site, your clinician may adjust needle choice or guidance.
- Consistency reduces variability. Once your clinician shows you the correct approach, repeating it similarly each time helps avoid accidental IM placement.
In practice, I’ve seen comfort improve fastest when people stop “chasing” different angles mid-injection and instead focus on consistent site selection, skin prep, and a controlled, slow injection.
Pros and cons of each subcutaneous site
| Injection site | Typical advantages | Common challenges | Best for |
|---|---|---|---|
| Outer upper arm (triceps area) | Good reach for many people; stable fatty layer once identified | May be harder if you can’t relax or access comfortably | Self-injectors with good upper-arm access |
| Abdomen (away from belly button) | Easy to see; often comfortable once practiced | Must rotate sites; choose areas with enough subcutaneous tissue | People who prefer visual guidance |
| Front/outer thigh | Stable surface; often works well with a caregiver or self-injection | May be less convenient for some patients; pinching technique matters | Caregiver-assisted injections or those who prefer thigh access |
Common mistakes I’ve seen (and how to avoid them)
- Injecting into the same exact spot repeatedly: leads to irritation and lumps—rotate instead.
- Not letting the alcohol dry: increases sting and can make the skin feel sticky.
- Injecting too fast: tends to increase discomfort.
- Rushing the pinch/setup: many people feel pain because they tense up—pause, breathe, then inject.
- Ignoring “do not inject” areas: avoid bruised, scarred, or actively inflamed skin unless your clinician says otherwise.
FAQ
What’s the safest way to learn how to inject b12 subcutaneously?
I recommend getting an in-person or telehealth demonstration from a clinician first, then practicing the full routine (hand hygiene, site selection, skin pinch, slow injection) using the exact equipment prescribed. Once you’re consistent, technique errors decrease quickly.
Can I inject vitamin B12 subcutaneously in more than one site?
Yes. Using multiple vitamin B12 injection sites is usually helpful for comfort—site rotation reduces irritation. Keep to the sites your clinician approves (commonly outer upper arm, abdomen, and thigh for SC use).
What should I do if I get a lump after an SC B12 injection?
Mild lumps or tenderness can be normal. Avoid injecting into that exact point next time and rotate nearby. Seek medical advice if the area becomes increasingly painful, hot, red, or doesn’t improve over time.
Conclusion: Your next injection should feel more predictable
Choosing the right vitamin B12 injection sites and using a consistent SC technique is the difference between “every injection is a struggle” and “this is manageable.” For most people, the outer upper arm, abdomen (away from the belly button), and front/outer thigh are reliable SC options—especially when you rotate sites, clean properly, pinch the skin, and inject slowly.
Next step: Pick one site for your next dose, map out your rotation (left/right and a few distinct points within the area), and run through your setup checklist before you remove the needle.
Discussion